As you probably know, Varnish does not support SSL/TLS. This fact could mean for many people that their sites, which use Varnish as a proxy cache, would remain without HTTPS forever. It is not as bad as it sounds because you are now going to learn how to work out a solution.
Nginx is a really useful software because it can play multiple roles at once. You know that it is a quite efficient web server but it can work as a proxy server as well. In our case, it will become our SSL Termination Proxy. Look at the illustration below.
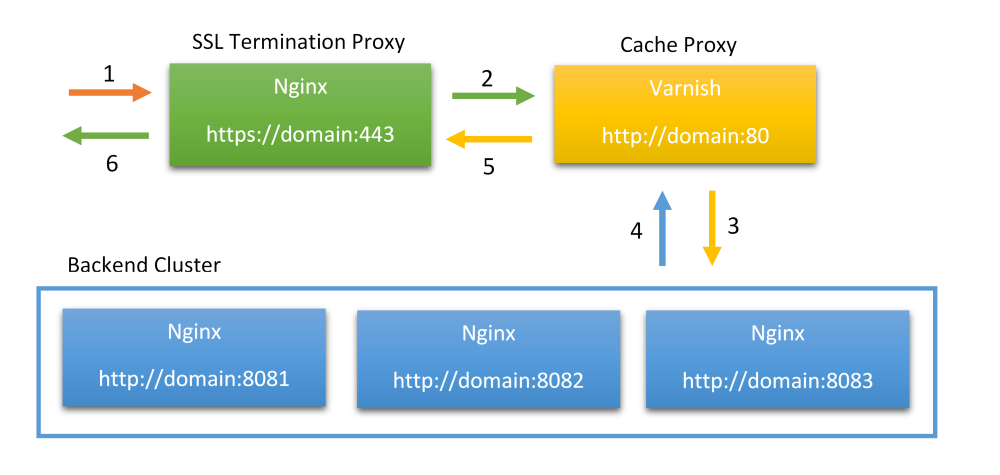
What happens on the scheme? Let us go through the process step by step.
- A user attempts to access our site over HTTPS protocol.
- SSL Termination Proxy (Nginx) forwards the request to the Cache Proxy (Varnish), which is only able to serve HTTP traffic. Note, in case Varnish has already has the content in its cache it immediately responds with that content and we move to step 5.
- Cache Proxy (Varnish) requests the content from one of the backend servers (Nginx) and caches it if necessary.
- The backend server (Nginx) responds with necessary content.
- Cache Proxy (Varnish) transfers the content to the SSL Termination Proxy (Nginx).
- SSL Termination Proxy (Nginx) encrypts the content and sends it to the end-user.
Notes:
- The backend cluster can consists of one or more servers.
- It is possible to use the same Nginx server for SSL Termination and for backend work.
All right, now when you know how it should work it is time to configure Nginx to listen to 443 port and work as an SSL proxy. I borrowed some code for you from the article How To Configure Varnish Cache 4.0 with SSL Termination on Ubuntu 14.04. By the way, you may also want to learn the article to get some more detail on how to install Varnish and related stuff. Now put the following code into your Nginx site config.
server {
        listen 443 ssl;
        server_name example.com;
        ssl_certificate /etc/nginx/ssl/nginx.crt;
        ssl_certificate_key /etc/nginx/ssl/nginx.key;
        location / {
            proxy_pass http://127.0.0.1:80;
            proxy_set_header X-Real-IP  $remote_addr;
            proxy_set_header X-Forwarded-For $proxy_add_x_forwarded_for;
            proxy_set_header X-Forwarded-Proto https;
            proxy_set_header X-Forwarded-Port 443;
            proxy_set_header Host $host;
        }
}
Do not forget to request an SSL certificate for your domain from an SSL provider and change ssl_certificate* settings accordingly. Also, change server_name so that it matches your domain name. Ah. I have just realized that I need to redirect users from HTTP to HTTPS. Let us do it through Varnish (version 4) config. It's necessary to add something like the following code to the appropriate Varnish config sections (vcl_recv and vcl_synth):
import std;
sub vcl_recv {
  # Ask Varnish to fire 750 status for HTTP requests from external IPs and port 80,
  # and not from SSL Termination Proxy (Nginx).
  if ((client.ip != "127.0.0.1" && std.port(server.ip) == 80) &&
      (req.http.host ~ "^(?i)(www\.)?komelin.com")) {
    set req.http.x-redir = "https://" + req.http.host + req.url;
    return (synth(750, ""));
  }
}
sub vcl_synth {
  # Listen to 750 status from vcl_recv.
  if (resp.status == 750) {
    // Redirect to HTTPS with 301 status.
    set resp.status = 301;
    set resp.http.Location = req.http.x-redir;
    return(deliver);
  }
}
And we are ready to go!
In conclusion, I suppose there can be ways to teach backend Nginx to serve HTTPS traffic directly without Varnish. However, in that case, your HTTPS users will not be able to benefit from the blazingly fast Varnish cache.
Read next: How to Fix the Error: This Page Is Not Secure Because of Mixed Content